
The Mitchell’s Dining Table Retrospective
True to form, a closed project equates to another opportunity to share reflect and share learnings, both good and bad.
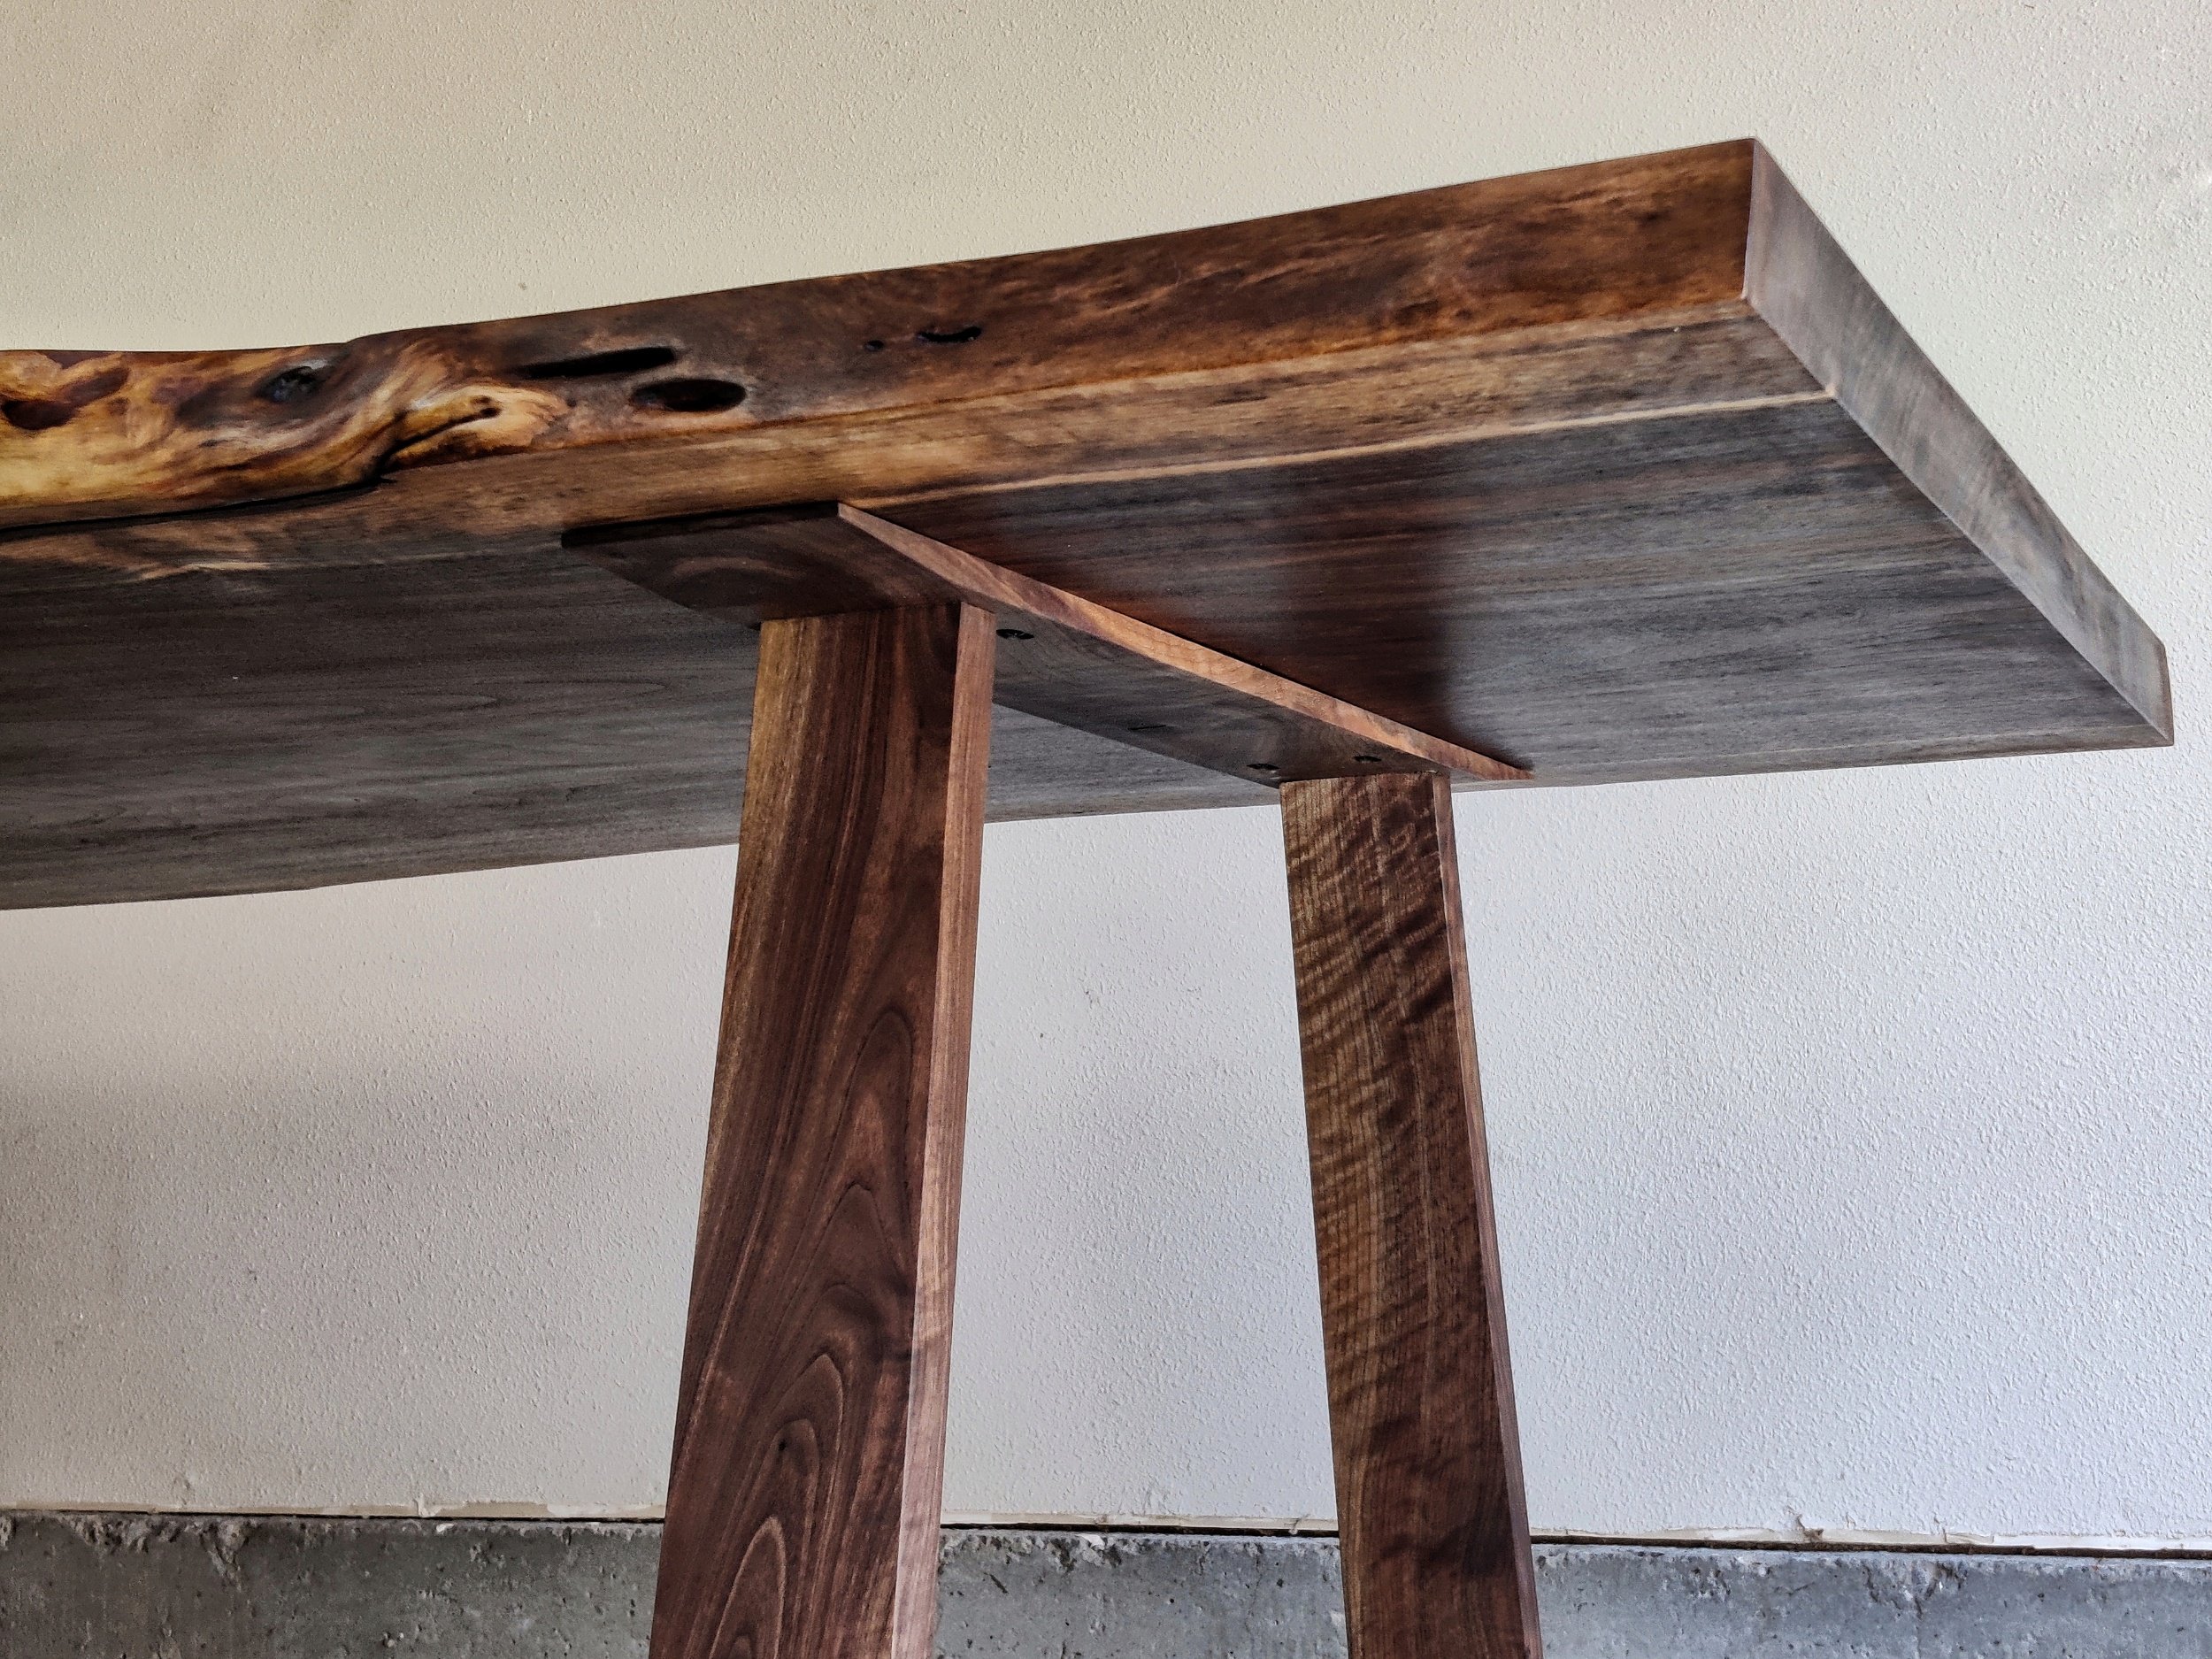
This project had many firsts. First dining table, first live edge slab table, first angled mortises, and too many video editing firsts to list.
While the project had a few bumps and I received my fair share of bruises I’d call this one a resounding success. Not only was it a challenge with some new joinery techniques it also ended up being on of the most beautiful projects I’ve ever made with some of my best pictures and the best video so far.
Needless to say, there were a lot of good things that happened on this one, but still a few bad to reflect on.
I’ll break this retro down into three phases which coincide with the three parts that all took equal effort which are Initiation, Details, and The Video.
Initiation
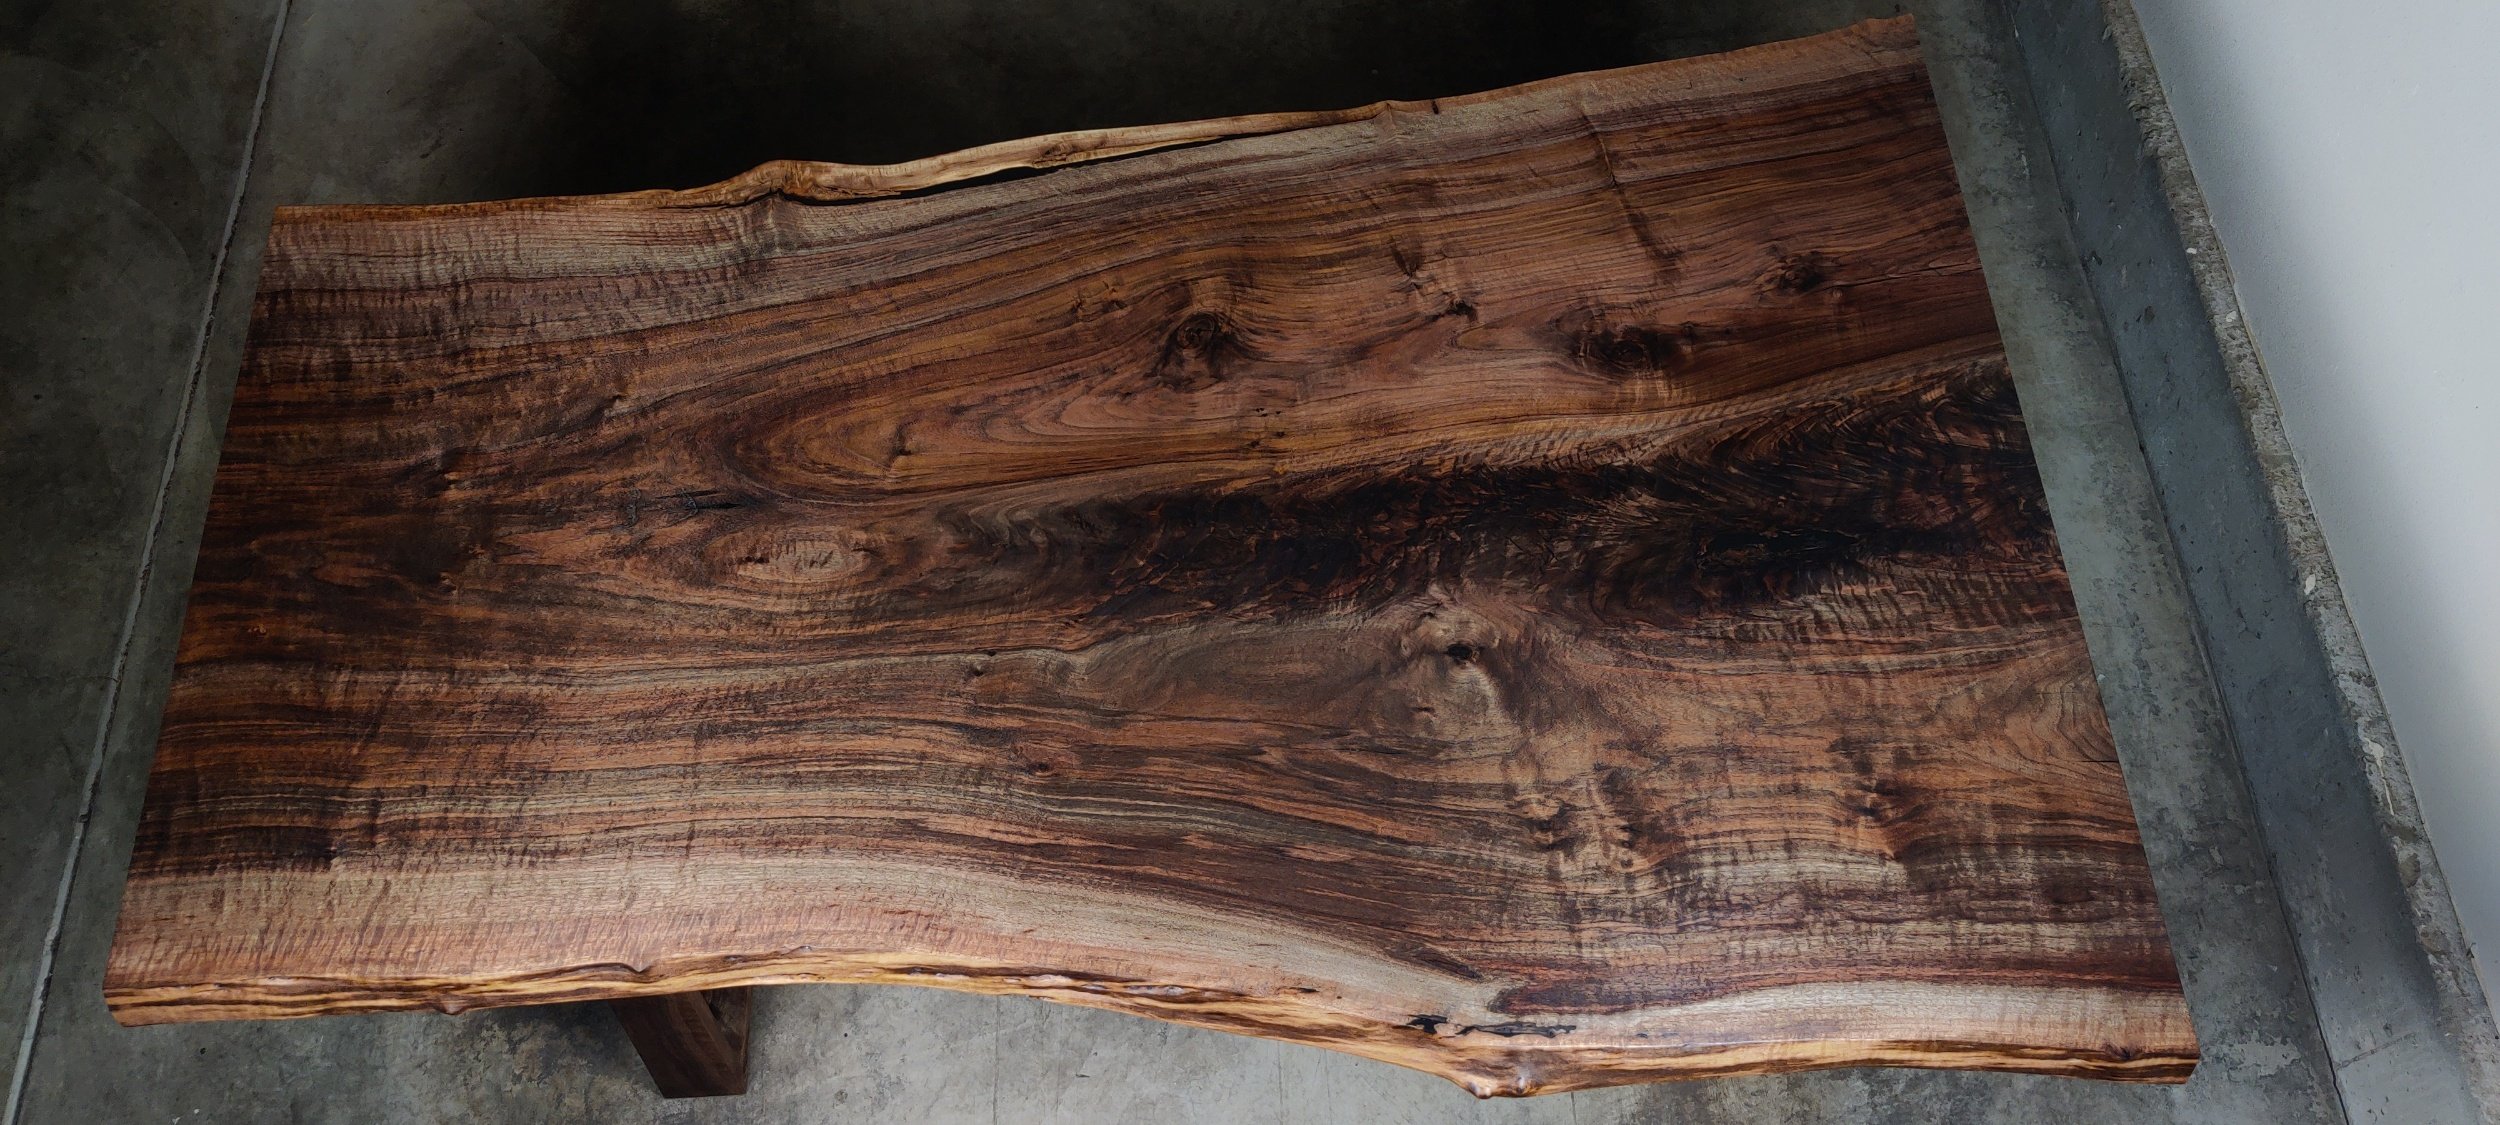
This portion of the project relied heavily on strength. When I work on a project I like to keep parts big, but at this scale big also meant heavy. I honestly never thought too much about live edge projects as their outward appearance is that of simplicity. Cut a slab, sand it down and apply some finish. How hard is that?
Turns out there’s more to it. Slabs are heavy, hard to move, and a ton of work to do the little things.
Bark removal was by far my least favorite portion of the project. It was messy and a lot of tedious work. But I did learn an efficient way to remove bark and I do think this slab in particular was difficult. I’ve removed bark before and it peeled right off. This bark had a firm hold which made my job all that much more difficult.
Then there was the flattening, which I’m so glad I outsourced. The fee was marginal compared to the effort saved. Plus that one act removed roughly 100 pounds from the slab making it much more manageable to move alone.
Other than that the rest of this phase was filled with normal woodworking stuff. Jointing, planing and preparing stock to turn into parts.
The Good
All the stuff I’ve done before went really well which tells me I’m getting better at it.
The Bad
Bark removal, but I learned to remove the bulk by smacking it off with a mallet and save the chiseling until it’s mostly removed. Then for all that dark connective tissue, sand first then gouge the low areas out.
Details
This phase started at the conclusion of milling when I began construction.
Technically it all started in the design, but that was a rough sketch which was refined during construction, and I am very pleased with out it turned out. The details came together very well with very minor annoyances to call “The Bad.”
While I was pleased with how the finished ended, I wasn’t really happy with the sanding job I did. I power sanded to 320 and hand sanded up to 400, but there were still some streaks. I tried steel wool and abrasive pads to remove them, which I did to some degree, but they were still there. It’s almost like they were burnish marks, maybe because I sanded too high.
Secondly, the bevels. I cut the beveled ends first with the band saw, cleaning them up with a hand plane. In hindsight I should have cut them completely by hand starting with a hand plane. This is partially because of the band saw blade I was using. The blade was pretty thin, more for curves, a wider blade would have been better. The depth of cut also encouraged drift which was very hard to correct given I was cutting through 5 inches of wood and magnified the issue, leaving more clean up with the hand plane.
Other than those two small things I was very happy with the project at this phase. The joinery in particular turned out awesome and rock solid. I designed it specifically to resist racking and the joinery definitely does the job there. This table has very little movement when pushed on.
The Good
Joinery
The Bad
Sanding too much
Bevels at the band saw
Video
I mentioned how each section took the same amount of effort. Surprising that a video would be as much work as making a table, but it was.
Creating a video starts before the project. Planning out an outline which serves two purposes. One, it ensures I capture the correct shots during the build, and two, it helps me layout my project plan.
Once I started building I added a filming complexity by capturing 2-4 different shots or angles for every action. That meant every time I wanted to make four quick cuts I had to reset cameras and lights for every single cut, making the time go from a minute to 10.
While filming extends the project build time, there’s another task that take a long time, going through footage. Usually every couple of days I pull footage into my editing software and do a quick, rough cut to weed out what I don’t need. This translates to taking an hour’s worth of footage and cutting it down to 1-3 minutes of rough cut video.
Once I finished building the legs I drafted out a full voiceover script. The problem is I wrote it for a 30 minute video, before I started cutting. Then I cut, and cut, and cut, until my cutter was sore, which meant cutting large portions out of the script.
I also changed the way I did voice overs. I would read one paragraph at a time and only record in 10 - 30 second snips, that way if I stumbled I didn’t have to throw away 1 minute of good voiceover because I messed up at 61 seconds. It also made editing easier as I could move stuff around and had definite breaks for cuts.
Then, with all that work done to get a pretty decent video I started adding music. That’s when I realized music wouldn’t keep the flow going with so much talking, so I went at it again with my trimmers and hacked away, taking the then 22 minute video down to xx minutes which meant more voice over recording to get it all to match.
But it was all worth it. I learned a lot and am developing a style I really enjoy. The video I produced is a video I would watch. Some of my past videos are decent, but often even I get bored rewatching them and if I can’t sit through it then how could I expect anyone else to.
While it was painful at the time, I knew it would pay off, but only if I did it all the way.
The Good
The end product
Developing new skills and a better process
The Bad
I don’t have a good system for this new process and it took a long time. I hope to improve and speed the process up for the next video
If you haven’t had a chance to give it a watch, here’s the video.
All new projects are opportunities to try new techniques, build skills, and create something I am proud of and on this project I nailed all three which is why this is my favorite project yet.